OverlayFS Net Booting
26 January 2015
I’ve spent today configuring a cluster, and part of that involved setting up net booting with support for local changes. Since this isn’t very coherently covered by existing blogs, here’s a vague attempt to cover the basics.
Originally, this design was for a hadoop cluster, but I’m not going to dwell on that, instead focusing on the network and disk setup.
The Goal
So, the overall aim is to have a simple way of maintaining updates across a number of machines, whilst allowing them all to retain data between reboots. The setup we’re after is simple:
- All OS files are stored on a central server, and booted over the net
- Each client machine has local storage (more than RAM)
- Updates need doing only to the central image, and can be applied simply by rebooting clients
Most importantly, I don’t want to be tasked with maintaining various bits of software across all the clients in the cluster.
Architecture
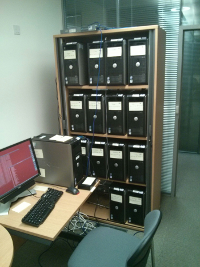
The deployment will be based around a single controller machine, and a number of clients. Each client has a local disk, and connects to the controller over a local, private, network.
These clients will run a disk image that is cloned from the controller on boot. When clients write back to their disks, we want them to write back to their local disk, so that changes persist across boots.
By changing the client image on the controller machine, we can change what software runs on the clients. This allows us to distribute dependencies for distributed tasks simply and without centralised logins. For hadoop, this means we no longer need the stupid startup scripts, centrally list the slaves, or provide shell access across the network.
To do this, we need to:
- Instruct client machines to boot from the network using DHCP (using DNSMasq)
- Offer a disk image they may boot from using this (via TFTP)
- Provide kernels with some way to modify this disk on use without writing back to the controller (OverlayFS)
- Provide each client with a unique ID (applied in the mkinitcpio)
The tools
So, what’s needed to deploy this. Booting from the ’net is simple enough using DHCP and TFTP. PXELinux can handle the loading of the kernel and initramfs, and then all we have to do is bring up some kind of unionFS. Simples.
The Network Setup
To start, we need to set up a DHCP server to:
- Grant IPs on the LAN;
- Handle DNS names (important for Hadoop);
- Instruct clients to netboot over TFTP.
For this, I’m using DNSMasq. The controller has two interfaces, one of which faces the client machines and is called cluster. The other, which connects to the internet, is called wan.
The DNSMasq config file looks a little something like this:
# Listen only on the LAN side
except-interface=wan

# DNS
listen-address=127.0.0.1,172.16.0.1
resolv-file=/etc/resolv.dnsmasq.conf
local=/local/
# Skip hosts to avoid bonn == 127.0.0.1
no-hosts

# DHCP/TFTP
bind-interfaces
dhcp-range=172.16.1.1,172.16.254.254,36h
dhcp-boot=arch/boot/pxelinux.0,controller,172.16.0.1
enable-tftp
tftp-root=/srv/tftp/
Here, we have placed the files necessary for PXElinux and TFTP booting in /srv/tftp. I’ll get to that side of the config in the next section.
Clients should connect to the above, receive an IP in the 172.16 range, and then be presented with the PXELinux bootloader, loaded from /srv/tftp/arch/boot/pxelinux.0. This will be instructed to contact the controller machine (hostname controller).
NBD & PXELinux
DHCP points clients at the PXELinux bootloader, loaded over TFTP. This, in turn, needs to be configured to point at a network disk. To do this we use NBD. We’re going to use a disk image of a full arch install, and place it in /srv/tftp/arch.img.
To tell NBD about this image, the following entry is added to /etc/nbd-server/config:
[arch]
	exportname = /srv/tftp/arch.img
	copyonwrite = true
	#port = 10809
Here we tell NBD to offer a disk image as the root image under the name “arch” on the port 10809.
PXELinux must be configured to tell the kernel on the client to retrieve this during boot. The PXELinux config, /srv/tftp/arch/boot/pxelinux.cfg/default, looks like this:
default linux

label linux
kernel vmlinuz-linux
append ro initrd=initramfs-linux.img ip=:::::eth0:dhcp nbd_host=172.16.0.1 nbd_name=arch root=/dev/nbd0 nbd_port=10809
Finally, we must instruct the kernel inside the client image to use the network disk by adding nbd to the HOOKS line in /etc/mkinitcpio.conf and re-running mkinitcpio for that image:
HOOKS="base udev modconf block filesystems keyboard fsck net nbd"
Filesystem
You’ll note that we’re loading the bootloader from one place and the rest of the root image from another. Our setup makes these into one portable image by loop-mounting the NBD image into the TFTP server location, using a systemd service:
[Unit]
Description=Mounts required to serve TFTP boots on the cluster
Requires=-.mount

[Service]
Type=oneshot
ExecStart=/usr/bin/mount -t btrfs -o loop /srv/tftp/arch.img /srv/tftp/arch

[Install]
WantedBy=multi-user.target
When we wish to work on the client image, we can simply edit files in /srv/tftp/arch and they are also served over NBD.
OverlayFS
So, at this point we have client images loading their bootloader over TFTP, then using NBD to mount their root disks and booting normally. Unfortunately, they will write all of their changes back to the server over NBD, which we don’t wish to keep.
This is where OverlayFS comes in. OverlayFS will allow us to mount two filesystems: one local to the machine, and one from NBD. We’ll read from NBD if data isn’t on the local disk, and write back to the local disk.
In order to use this scheme, we have to be sure that the local disk is clean, containing mountpoints for OverlayFS to place the two filesystems.
First, let’s amend our mkinitcpio.conf to load the overlayfs module:
MODULES="overlay"
Next we will set up the overlay itself on the root disk. Since we wish to perform this action before the root disk is mounted read-write, I added it to one of the hooks called by the init system, amending /usr/lib/initcpio/nbd to include the overlayfs mounting as well as the NBD mounting. There is doubtless an easier and neater way of doing this.
# Handler that mounts rw on tmpfs
aufsnbd_tmpfs_mount_handler() {

  mount -t ext4 /dev/sda1 /new_root/rw -o rw,noatime

  mkdir -p /new_root/rw/upper
  mkdir -p /new_root/rw/work

  mkdir /new_root/ro
  mount /dev/nbd0 /new_root/ro      -o ro

  mount -t overlay overlay /new_root -o lowerdir=/new_root/ro,upperdir=/new_root/rw/upper,workdir=/new_root/rw/work
}
But there is one more thing: my machines were old ones from the Lancaster University labs, and I couldn’t rely on their disks being clean. For the above to work, I have to be able to mount the local disk and write to it. Rather than sit down and manually wipe disks all day, I added some gloriously dangerous logic:
- Inspect the local disk and try to mount it as ext4;
- If that doesn’t work, wipe it and create a single ext4 partition for future use.
Oh yes. Any machine you boot on the LAN side without ext4 on /dev/sda1 will get wiped and turned into a slave. This saves me an awful lot of work: expanding the cluster is a matter of plugging a computer into the network and booting it and nothing else.
The final init hook looks a l’il like this. Note the addition of sleeps to let the hardware settle. They’re always a sign of quality.
# Handler that mounts rw on tmpfs
aufsnbd_tmpfs_mount_handler() {

  echo "OVERRIDDEN MOUNT HANDLER"
  echo "*** Ignoring root= flag in favour of overlayfs netboot"

  modprobe overlay

  mkdir /new_root/rw

  # Attempt to mount the writable disk as ext4.
  mount -t ext4 /dev/sda1 /new_root/rw -o rw,noatime || {
	# just in case
	umount /dev/sda1
	msg "*** Reformatting local disk..."
	sleep 1
	# If this doesn't work, create a new partition using fdisk
	sfdisk /dev/sda << EOF
0
;
;
;
y
EOF
	sleep 2
	dd if=/dev/zero of=/dev/sda1 bs=512 count=1
	sleep 2
	mkfs.ext4 -F /dev/sda1
	sleep 2
	mount -t ext4 /dev/sda1 /new_root/rw -o rw,noatime || {
		echo "*** Mounting the local disk failed"
		echo "Ensure /dev/sda1 is ext4 and works before trying again"
		exit 1
	}
	sleep 2
  }
  mkdir -p /new_root/rw/upper
  mkdir -p /new_root/rw/work

  mkdir /new_root/ro
  mount /dev/nbd0 /new_root/ro      -o ro
  sleep 2

  mount -t overlay overlay /new_root -o lowerdir=/new_root/ro,upperdir=/new_root/rw/upper,workdir=/new_root/rw/work
}
Unique Hostnames
Since we’re serving a single image to all machines, we need some way of ensuring that hostnames don’t collide. We have persistent storage on each machine, so only need to do this once, but it’s simpler just to tell systemd to mess with the hostname. On boot, each one launches a small shell script to set the hostname to the mac address.
Conclusion
So, there you have it. A client connected to the system for the first time will:
- Receive netboot instructions over DHCP, retrieving PXELinux;
- Connect to a network disk image and use it to load a kernel ramdisk;
- Inspect its own disks and repartition/reformat them to contain a single
ext4partition; - Mount this partition alongside the local disk using OverlayFS